Crop Basics
Growing crops and flowers in Harvest Moon: One World will help to move the story along. They can also be shipped for profit or cooked in the kitchen, which can then be shipped for money too. There are 7 large farm areas around the world, plus 1 in the DLC Wagashi area. The terrain in each of these areas, along with the smaller scattered fields throughout the world, can affect whether the crop or flower mutates when the plant matures. Crops and flowers will always grow within the same number of days regardless of where they are grown (e.g., there is no fast-growth field).
A description of the terrain that the crop prefers is listed on the crop seed details. The 8 terrain types are:
 Beach - Head to the tropical shores of Halo Halo to find this crop space close to the ocean.
 Desert - The arid desert of Pastilla can be used to grow some crops, though you may need to use fertilizer to ensure they survive the scorching heat.
 Meadow - This calm area is on the farm of the Calisson region. There is a blocked-off area on the Calisson farm that unlocks more field
space after completing the main story.
Meadow - This calm area is on the farm of the Calisson region. There is a blocked-off area on the Calisson farm that unlocks more field
space after completing the main story. Mountain - The rolling hills of Lebkuchen is where this farm biome can be found, surrounded by Lebkuchen Lake.
 Paddy - This swampy area is south of the Harvest Goddess' shrine and unlocks after the main storyline has completed.
 Snowfield - A small farm space to the south of snowy Salmiakki.
 Volcano - Just to the north of Lebkuchen is a fiery volcano with a small field close to a lava flow. It is difficult to grow crops here, but some mutations will only take place in this hot spot.
 Wilderness - Also known as the jungle or forest, these far-away located fields are southwest of the Harvest Goddess shrine.
Since the desert and wilderness fields are a long walk from the teleportation shrines, there are smaller fields for these terrains that are closer. A small desert field can be found south of Pastilla, and a small wilderness field is in Halo Halo's coffee tree grove northwest of Cafe Mahalo.
The special water fields found on Wagashi Island are all-purpose fields that are always watered and can trigger mutations that would typically require crops to be planted in specific fields. It can be easy to trigger tier 2 mutations in the Wagashi fields, while tier 3 mutations take a bit more effort and aren't always successful.
Crop Health
Crops will successfully mature (and possibly mutate) when the plant is healthy. Standing on a planted crop will display your Farming Friend: a status bubble that indicates how healthy the crop is. The Farming Friend will also tell you what crop has been planted if you've grown that crop before.
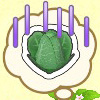


When a crop has poor health, the Farm Friend will display purple vertical lines. A healthy crop has no special indicators, while a super-healthy crop will have sparkles around its image. Crops that are new to your Encyclopedia will display a "?" icon at the time of harvest.
Plants grown in their preferred terrains and seasons will have overall better health. A plant that may not have a sparkly Farming Friend status may naturally improves its health and becomes sparkly while it is growing. The sparkly crops have a better chance of mutating when the parameters for mutation are valid (e.g., the right season and field). Mutations can still occur on average-health plants when they are tier 1 seeds, but they become rarer as you move into tier 2 mutations. Sparkly health is expected for tier 3 mutations to happen.
Crops that are in poor health have a chance of wilting before they can mature. Once they wilt, the crops must be plucked one at a time (arg...) and new seeds planted. Mutations will not trigger on poor-health plants. You can proactively improve the health of the crop by using fertilizer.
Mutation Tips
Crops mutate in the morning when you wake up. When trying to maximize mutations, save your game the night before going to bed. If you don't see any mutations on the crops you are concentrating on, reload you save game, go back to bed, and check your fields again in the morning. The only exception to this is with the Queen of the Night flower family, whereby healthy plants may mature at 8:00 pm the night before their expected full-grown date.
Mutations will only trigger when the plant is ready to harvest in the appropriate season for the mutation you're trying to trigger. For example, Wheat takes 4 days to mature and can mutate into Tall Wheat when grown in the Salmiakki snow field during fall. If the Wheat was planted late in the season on Fall 27, when the crop matures in Winter you'll end up with Rye instead of Tall Wheat.
And this may just be me, but it seems that growing fewer than 20 crops of a particular family in the same field at the same time has a positive affect on mutations. When mass-planting more than 20 seeds of the same crop in a field, I receive far fewer mutation successes than when I plant fewer crops. I may simply be crazy or something, but if you're having trouble getting mutations to pop, try planting fewer seeds.
Watering and Sprinklers
Your plants need to be watered daily to ensure they survive until they mature. Watering does not add to a plant's overall health status; it keeps the plant moving towards its final form. You don't have to water your crops on rainy days or on snowy days in Salmiakki. The Watering Can will cover more ground in one swing as you upgrade its power.

Say you don't want to mess around with watering at all? Doc Jr can help you with that! Sprinklers will water the crops adjacent to where they are placed in a field. The better the sprinkler, the more crops they'll water. After you have collected the Medallion of Wood from Pastilla, head to Doc Jr's house to learn about his life-changing invention. Doc Jr requests 5 Silver to help with his research. The Silver Ore can be collected from the Pastilla Mine and then processed into Silver metal at Doc Jr's shop. After bringing him the required metal, he'll add the basic Small Sprinkler to his invention options.
As you continue collecting medallions, head back to Doc's to see if he asks you to help him with more sprinkler research. The last Sprinkler Research request will appear after the Harvest Goddess has been revived.
In total, there are four levels of sprinkler range. When placed on a field, the sprinklers will spray water in a directional, square range from where they're located. The higher level the sprinkler, the farther the water can go. The first level just waters the squares directly adjacent to the sprinkler, while the fourth level waters up to 4 squares away.
- Small Sprinkler: 1 Silver + 1 Glass + 100 G
- Sprinkler: 1 Gold + 1 Glass + 100 G
- Splendid Sprinkler: 1 Platinum + 1 Glass + 100 G
- Super Sprinkler: 1 Adamantite + 1 Crystal + 100 G
The sprinklers turn on when you awaken in the morning and run for 1 hour, even when the weather is rainy or snowy.
Fertilizer
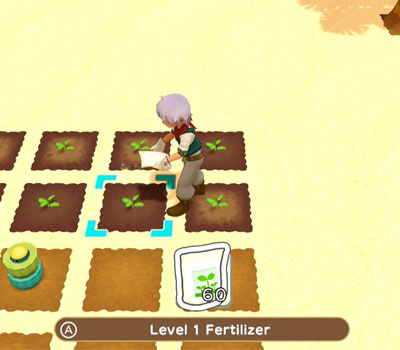
Adding fertilizer will increase the health of your planted crops. Fertilizer must be applied after the soil is watered and on one plant at a time (arg...). The level 1 version will increase health a little bit, while level 3 will greatly help with crop health. To have a chance of mutating into tier 3 crops and flowers, you'll need to apply Level 2 Fertilizer or Level 3 Fertilizer to make the Farming Friend sparkly.
After fixing the problems with Calisson and unlocking access to the Halo Halo mine, Doc Jr will visit to tell you about a new invention. Bring him 3 Bronze from the mine to receive a Fertilizer Maker on your farm. This machine can convert 1 Compost into 10 Level 1 Fertilizer. Compost is a by-product of animal care. Once you start caring for animals, you'll randomly find Compost on the ground inside the Animal Barn. There doesn't appear to be an animal food that makes greater amounts of Compost appear.
Once you clear the main story, head back to Salmiakki and talk to the two villagers standing between Kirsi's and Suri's houses. Henri will want your help with researching new types of fertilizer. Bring him 5 Broccoli to unlock the recipe for Level 2 Fertilizer, and then bring him 10 Level 2 Fertilizer to unlock the recipe for Level 3 Fertilizer.
The next set of fertilizer recipes comes from Omar in Pastilla, located inside the house to the right of Saeed's house. Omar will request 2 Sheep Wool in exchange for three Water Retention Agent recipes.
While the normal fertilizers must be applied daily, the level 2 and level 3 Water Retention fertilizers will remain on the soil for several days. Level 2 Water Retention stays on the crop field for 2 days, and Level 3 Water Retention stays on for 3 days.
After completing Saeed's task, talk to Sarah in Calisson. She and Elijah live in the house next to the general store. She'll tell you that she's researching a fertilizer that can make crops grow faster. Bring her 4 Crucian Carp to receive the Growth Promoter recipes.
Growth Promoter ferilizer will increase the number of days the crop matures, but can have a significant impact on its health. Level 1 speeds up growth (or regrowth) by 1 day, level 2 speeds up by 2 days, but both of these also decrease the plant's health. Level 3 also speeds up growth by 2 days and does NOT impact crop health.
You can also buy fertilizers from the town shops as you unlock the recipes. Unfortunately, the fertilizers are rather expensive to purchase one bag at a time. It's more efficient to make fertilizer because you'll receive 10 bags of fertilizer with each successful material combination. The fertilizers can be purchased at Halo Halo, Pastilla, and Salmiakki.
| Name | Ingredients | Store Price |
|---|---|---|
| Level 1 Fertilizer | 1 Compost | 400 G Halo Halo Pastilla Salmiakki |
| Level 2 Fertilizer | 1 Compost + 1 Milk | 800 G Halo Halo Pastilla Salmiakki |
| Level 3 Fertilizer | 2 Compost + 1 Jersey Milk | 1600 G Halo Halo Pastilla Salmiakki |
| Level 1 Growth Promoter | 2 Compost + 1 Mosquitofish | 400 G Salmiakki |
| Level 2 Growth Promoter | 3 Compost + 1 Crucian Carp | 800 G Salmiakki |
| Level 3 Growth Promoter | 4 Compost + 1 Piranha | 1600 G Salmiakki |
| Level 1 Retention Agent | 2 Compost + 1 Sheep Wool | 400 G Pastilla |
| Level 2 Retention Agent | 3 Compost + 1 Valais Blacknose Sheep Wool | 800 G Pastilla |
| Level 3 Retention Agent | 4 Compost + 1 Cashmere | 1600 G Pastilla |